Tech Talk
Vacume Press Veneering
Jamie Buxton
Veneer is just thin slices of wood. For the most part it works just like solid lumber. Applying it and working with it is not a mysterious process, and anybody in BAWA can do it.
There are many reasons for using veneer, but two are important for small shops. First, you can get species and figure that are completely unavailable in lumber form. Any good veneer retailer has at least a hundred different kinds of veneer, and many have more than that. Second, veneer-covered plywood can do structural things that just cannot be done in solid lumber.
Veneer is made by slicing thin slices off a log. Commercial veneer is typically .025" thick. It is shipped, stored, and sold in the order it came off the log. That is, you get leaves of veneer which have similar grain patterns on the face. You can use this similarity in many ways. One example is bookmatching, where the grain forms a mirror-image pattern. Another is slip-matching, where the grain pattern repeats almost identically across the panel.
I buy veneer in the leaf form, unprocessed in any way. This gives me the most control of the veneer, and the most flexibility in design. I don't use processed veneers, but want to mention them because you will encounter them in local lumber yards. Manufacturers process veneers by edge-jointing them, sticking them together into larger sheets, and backing them with paper or polyester. These sheets are used to reface kitchen cabinets. Generally you can only get the six standard cabinet woods, and you can't get interesting figure. Also, there are techniques like book-matching which can't be done. And on top of that, the price of the veneer sheet is generally higher than the price of a plywood with the same veneer as its face.
Veneering process
There are lots of ways to use and apply veneer. The following is what I've found works for me -- a one-man shop mostly making fine furniture.
Cross-cutting
Use a straight-edge and sharp knife. On most veneers, you can just score the veneer, and, holding the straight-edge in place, bend the veneer up to snap it on the score line. If the veneer doesn't snap cleanly, use the knife to cut all the way through each leaf. Books and catalogs show veneer saws, which I used for many years. However, the sharp knife works better for me. It is less work, and has less tendency to split out the veneer edge at the end of the cut. I also use the knife and a straightedge to straight-line veneer. However, for straight-lining I cut all the way through the veneer; snapping tends to follow the grain lines, not the knife cut. I almost always cut veneer oversize, glue it down, and then trim the panel. That is, in my process cross-cutting is not a precision operation.
Edge-jointing
Clamp the stack of veneers right near the edge you're jointing, and shoot it with a plane. It is important to clamp the veneers near the edge-say within 1/8". If you clamp the veneers further away from the edge, they may curl away from the plane, and give a non-straight edge. I clamp the veneer with two boards and a bunch of weights. This approach works with wide veneers and long veneers, and is easily stored.
Taping
Align the jointed veneer leaves, and use veneer tape to hold them together. The tape goes on what will be the visible face, not the glue face. Tacking the seam together every few inches works. However, I tape the entire length of the seam, partly because it is a little stronger, and partly because I find it easier. I use veneer tape for almost everything. Occasionally I use brown paper tape for veneers that fight the seaming process because it is stronger than veneer tape. However, it is thicker, so it takes more work to remove. To apply the veneer tape, I cut a convenient length of tape, and wipe it over the sponge to wet it. I stick the right end of the tape down, and kinda wipe it right to left, pinching the veneer seam together with my left hand as I go.
Spreading glue
When you're gluing lumber joints, you can be sloppy with the glue. Excess will squeeze out of the joint, or down into the bottom of the mortise, and not cause troubles. With veneer, there's no place for excess glue to go; it isn't going to squeeze two feet over to the edge of the panel. With a too-thick ocean of glue underneath the veneer, it can choose its own shape, and not come out flat.
I use a toothed trowel to spread PVA. Most toothed trowels intended for tiling have teeth that are too big, and they apply too much glue. A good size is 1/16" vee-shaped notches on 1/16" centers, but it is rare. A budget alternative particularly useful for small panels is to make your own from an old credit card. With a bandsaw or handsaw, just nick the edge. You don't have to be super-precise with the teeth, after all, you're just spreading glue. With PVA, I aim at getting the substrate wetted with glue everyplace, but I don't leave a big layer. The vacuum press will make sure the veneer contacts that thin glue film.
I use a foam paint roller to spread urea-formaldehyde. The glue is somewhat thicker than latex paint, and a roller does a good job with it.
Substrate materials
MDF and plywood work well. When I use plywood, I get cabinet-grade plywood, not house-building stuff. Plywood intended for cabinets has more plys than house-building stuff, so it is more stable, and is less likely to be warped. You can buy it with inexpensive face veneers not fancy show veneers-and it is not much more expensive than the potato-chip plywood used for building houses.
You can also veneer solid lumber. Until 50 years ago, all veneering was done on solid lumber substrates. Craftsmen put fancy veneers on plainer lumber. Of course, you must allow the veneered lumber to move with humidity changes.
Pressing
Outside the bag, assemble a sandwich. It consists of the substrate with glue on it, the veneer, and sheet goods for cauls. I generally use a sheet of plastic drop-cloth between the veneer and the caul to prevent glue bleed-through from gluing the caul to the veneer. On thin panels, it is good to veneer both sides of the panel, and do both sides in one pressing. Slide the sandwich into the bag, close the mouth, and pump it down.
Removing the tape
I use a random orbit sander to remove the tape, and at the same time sand the entire veneer surface. I generally start with 60 grit. This heavy grit may startle people who have sneezed and gone through the veneer on commercial plywood. However, those veneers are much thinner than veneer sold in leaf form. This veneer is much more tolerant of sanding, and random-orbit sanders are fairly gentle.
If you don't like sanders, you can use a cabinet scraper or a scraper plane. They take much longer, and the tape has a tendency to clog up the cutting edge. But they aren't noisy!
Press cross-section
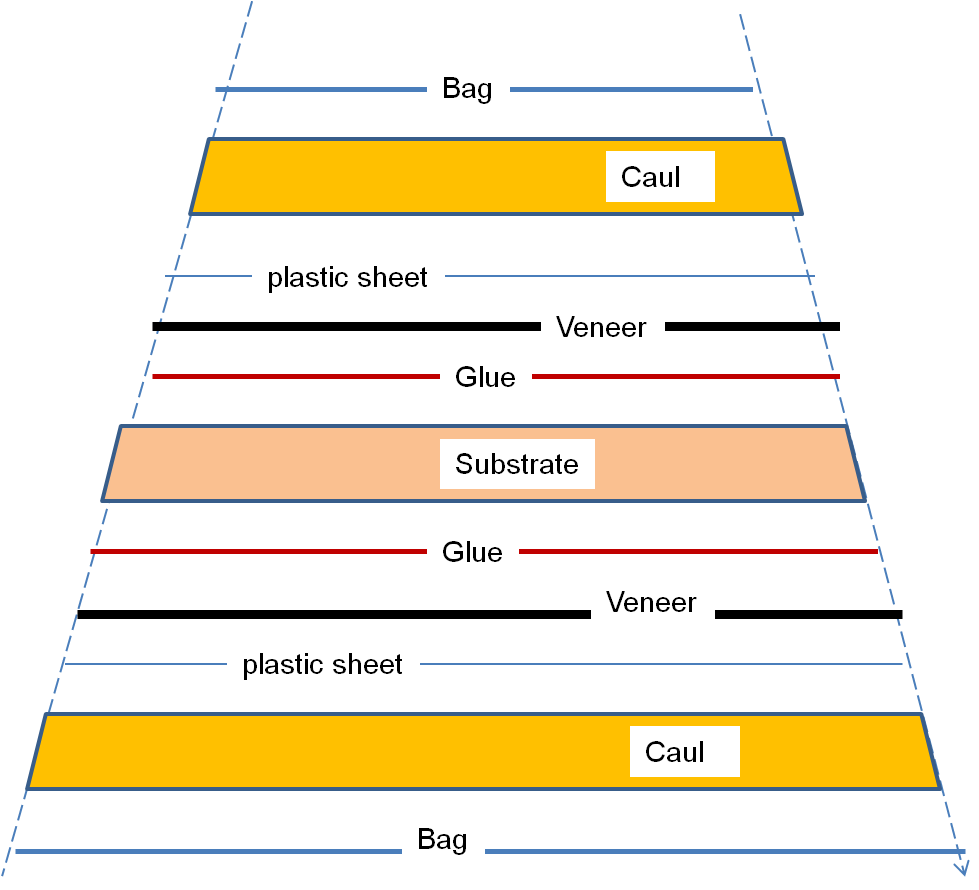
This diagram shows veneer being simultaneously glued to the front and the back of the substrate. The plastic sheet ensures that if glue bleeds through the veneer, the cauls don't stick. The cauls are anything big and flat–for instance 1/4 in. plywood. They ensure that the press's pressure is uniformly distributed on the veneer.
Books and articles often recommend an elaborate platen with grooves cut in it so that air won't be trapped. I've stopped bothering to cut the grooves. Air will get through very tiny spaces, and gets to my tube without the grooves.
For thin panels, where the surrounding frame will hold the panel flat, I don't bother with a platen. I just use the cauls as shown above. For assemblies where it is important that the panel be flat: for instance a drop-leaf. I have a torsion-box platen which is really flat. It goes inside the bag in place of the lower caul.
Veneering techniques compared
Contact cement
Getting the right amount of glue spread everyplace is touchy. Worse than that, the bond can be attacked by the solvents in finish.
Hammer veneering
Slow for big panels. Messy–with double-boilers and such. However, this is one of the ways the old-timers used to do it.
Carpenters clamps, C-clamps, and the like
Limited to very small panels; can't get clamping pressure more than a few inches from the edges. Also, it is difficult to get uniform pressure over all the panel.
Screw press
For furniture-sized panels, press is expensive to build and difficult to store.
Iron-down gluing
Slow for large panels. Expensive if you use commercial glue sheets. Rough on your marriage if you use your spouse's good clothes iron.
Vacuum press
The best, by a large margin. I built my first 20 years ago, and haven't looked back. (A vacuum press can also be used for things other than flat veneering. It adapts nicely to veneering curved forms. It can laminate solid lumber. It can be used to make bent laminations. Maybe you remember a dining chair I showed at a BAWA meeting last year.)
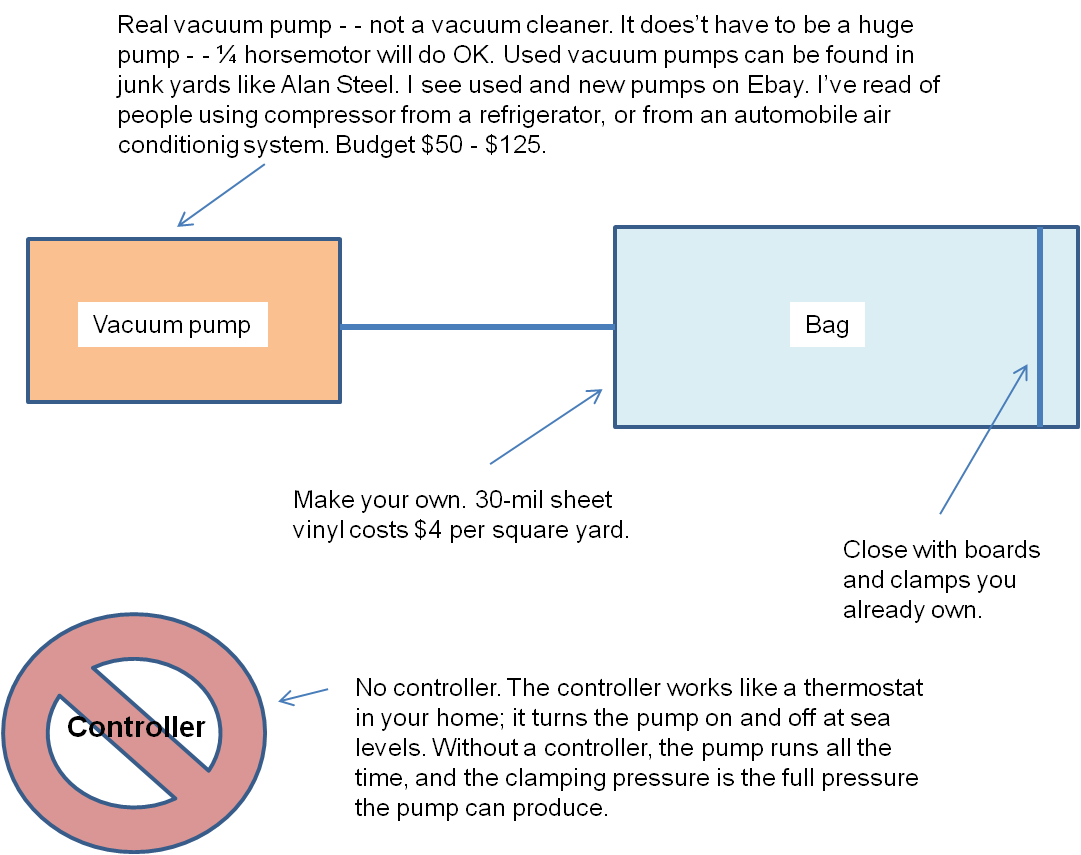
Budget home-brew vacuum press
Vacuum pump specs
Vacuum pumps have two specs. The rate at which it moves air is spec'd in cubic feet per minute (cfm). The vacuum pressure it produces is generally spec'd in inches or millimeters of mercury (in Hg or mm Hg), but sometimes in pounds per square inch (psi), and occasionally with scientific units (kiloPascals or Torr). Two inches of mercury is about one pound per square inch.
Most real vacuum pumps produce at least 12 psi, which is easily enough for veneering. (Vacuum cleaners typically produce only 1-2 psi, which is insufficient.)
The cfm rating has two effects in veneering. First, it tells how quickly the pump can initially evacuate the air in the bag to achieve full clamping pressure. Second, it tells how big a leak the pump can handle while still providing full clamping pressure. 1 cfm is probably sufficient for most home-shop applications.If you're looking at a used pump, you may not be able to find a cfm rating. You might only be able to see the ratings on the motor. Generally a pump with a motor of 1/4 HP or larger will do 1 cfm or more. For instance, my pump is rated at 5 cfm, and has a 1/2 HP motor.
Vacuum pumps are either oil-less, or use oil as part of the pumping mechanism. A concern with oilbased pumps is that oil vapor will travel upstream into the bag and eventually contaminate it. You can get filters that block the vapor. A budget alternative is to use a longer length of clear vinyl hose to connect the bag to the pump. Watch for oil collecting on the inside of the hose, and replace the hose when it gets too oily.
Vacuum press glues
Good
PVA. (AKA Carpenter's yellow glue, Titebond, Elmer's Glue-all, etc)
I use it for smaller panels. It cures quickly, which can be an advantage. It can also be a disadvantage if you have a big area to spread glue over, or complicated assemblies to get into the press. It does cold-creep, so I don't use it for joints that will be under constant stress, for instance bent laminations.
Urea-formaldehyde.
I use it for most veneering. It is a two-part glue so there's an extra step of mixing the components, and you generally throw some glue away. However, it spreads nicely with a roller, is waterproof when cured, and does not cold-creep. It has a long open time, so it is less scary to use on big pieces than PVA. It doesn't cure below 65 degrees, so an electric blanket is useful if your shop is unheated. It cleans up with water before it is cured, so you can re-use mixing and spreading tools.
Bad
Contact cement.
This isn't a glue for a vacuum press, but I'll caution against it here anyhow.
Overkill
Epoxy.
For wood veneering, it offers no advantages over urea-formaldehyde. It is three times the price of urea-formaldehyde. I don't even try to clean tools which have touched it. However, if you want to veneer metal to wood, epoxy does work in a vacuum press.
I don't have experience
Premixed hide glue.
Polyurethane. For instance Gorilla glue.
I don't think it would work well. Because it is so thick, it wouldn't spread well over big areas. Also, it foams as it cures. Under atmospheric pressure, the bubbles in the cured foam are small. Under vacuum, they might get big.
Make your own bags
Shopping
Buy sheet vinyl. TAP Plastics sells clear vinyl that is 54" wide off a big roll. I like the 30-mil thickness; it is more durable than thinner stuff. While you're there, get vinyl cement. At TAP or at most hardware stores, get flexible vinyl tubing whose diameter fits your vacuum pump.
Prep
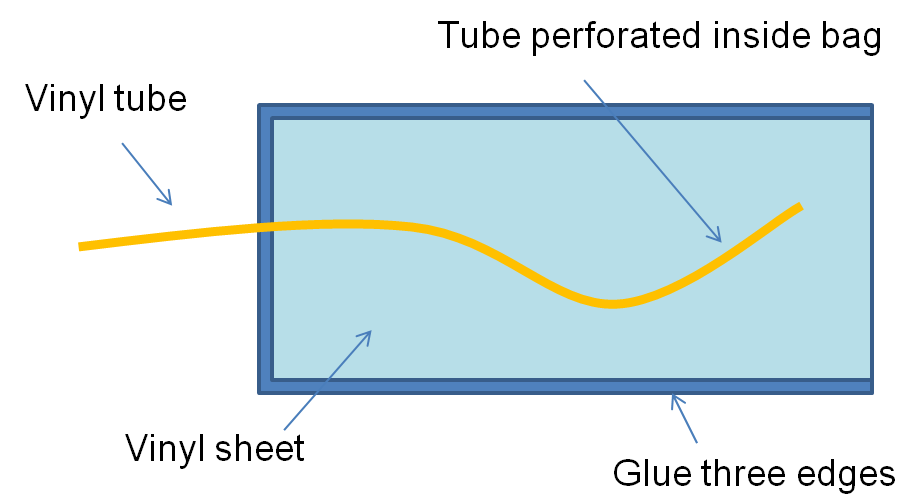
The vinyl tubing will extend inside the bag almost from the mouth to the other end. With a small bit and a drill, perforate the tube every few inches for the part that will be inside the bag. You don't have to be precise about this; air will find its way to the holes.
Assembly
If you can make your bag by folding over the sheet vinyl, you only have two edges to glue. If you need a bigger bag, you'll glue three edges. Run the tube through the bag's edge at the other end from the mouth. Glue the edges, and clamp with boards and C-clamps or whatever you have. When you're done, you have a vinyl envelope. It has one edge open, and the other three edges closed. The tube enters the envelope through the edge opposite the mouth, and is perforated inside the bag.
Closing the bag
You can close the bag's mouth by folding it over, and securing it with two boards and clamps. Another way is to build a snap-closure. It consists of a pipe over which you fold the bag's mouth, and another piece of pipe. This second piece of pipe is ripped so that it has a C-shaped cross section. It snaps over the bag as it wraps around the first pipe. The outer pipe should have a thin enough wall that it can deform to snap over the bag. It should have an inner diameter which is the outer diameter of the inner pipe plus four thicknesses of the sheet vinyl. For 30 mil vinyl, I use 1/2" Schedule 40 PVC pipe for the inner pipe, and 3/4" SDR 21 PVC pipe for the outer pipe.Tip
I duct-tape the tip of the vinyl tube inside the bag to the upper face. When I slide the workpiece into the bag, it doesn't shove the tube down to the foot of the bag. After I get the workpiece in the bag, I drape the tube so that it touches the workpiece, or even better runs down the edge of it.Resources
Veneer
* Ebay! Search on "veneer", and you'll see lots and lots of stuff. Some of it sells for remarkably low prices. I've bought good veneer from a vendor with the seller-name of "thouge".
* Certainly Wood. www.certainlywood.com
* B&B Rare Woods. www.wood-veneers.com
Veneer tape
Most veneer vendors carry it-for instance, Certainly Wood and B&B. Rockler (www.rockler.com)and Vacupress (www.vacupress.com)
Vacuum presses
* Quality Vacuum www.qualityvak.com
* Vacupress www.vacupress.com
Vacuum pumps
* Alan Steel has used ones in the $50-$125 range. 505 E Bayshore Rd Redwood City
* Ebay shows both new and used in a similar price range.
Urea-formaldehyde glue
* Unibond 800. $30/gal at www.vacupress.com.
* DAP Weldwood Plastic Resin. $6/lb at www.thehardwarehut.com
Plastics
* Sheet vinyl at TAP Plastics. They have 16 stores in the Bay area. Check your Yellow Pages.
* Vinyl cement. Also TAP.
* Vinyl tubing. Also TAP Plastics. Somewhat less expensive at Home Depot, OSH.
* PVC pipe for the zip-closer. Lowes sells both schedule 40 and SDR 21.
Cabinet-quality plywood
* Plywood and Lumber Sales. Four locations in the Bay area. Finn ply, Apple ply, or my current favorite is Sande. A sheet of 3/4in sande costs $35 or so.
Book
* The Veneering Book. David Shath Square. Taunton Press 1995.